
Before creating android project we need to have the following installations in our system
1. Download JDK 5 or JDK 6and install in our system. Set path by following instructions in http://www.java.com/en/download/help/path.xml
2. Download SDK from http://developer.android.com/sdk/index.html and follow the instruction to install SDK
3. Follow the procedures in below the link to download and install ADT plugin for eclipse.
http://developer.android.com/sdk/eclipse-adt.html
Screen shot look like

4.Download android server from http://code.google.com/p/selenium/downloads/list
Copy this into C:\Program Files\Android\android-sdk\platform-tools this path.
5. Install android server using Command Prompt. Go to the above path and install by usiing the command
adb install android-server-2.13.0.apk
After installation we will get the webdriver icon in application list

6. Click on webdriver icon then we'll get message like webdriver ready or Jetty started
1. Download JDK 5 or JDK 6and install in our system. Set path by following instructions in http://www.java.com/en/download/help/path.xml
2. Download SDK from http://developer.android.com/sdk/index.html and follow the instruction to install SDK
3. Follow the procedures in below the link to download and install ADT plugin for eclipse.
http://developer.android.com/sdk/eclipse-adt.html
Screen shot look like

4.Download android server from http://code.google.com/p/selenium/downloads/list
Copy this into C:\Program Files\Android\android-sdk\platform-tools this path.
5. Install android server using Command Prompt. Go to the above path and install by usiing the command
adb install android-server-2.13.0.apk
After installation we will get the webdriver icon in application list
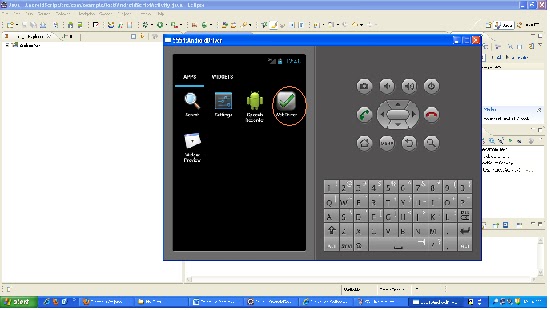
6. Click on webdriver icon then we'll get message like webdriver ready or Jetty started
Hi Anjaneyulu,
ReplyDeleteIm new to android web app testing using webdriver, can u please give me sample script to execute and required jar files.
Thanks,
Swetha
Here im able to get only the URL, but remaining script is not executing,
ReplyDeleteThank You,